Today one of my friends asked me to help him with sending a PUT request to a remote server, in Node.js. I started Googling and as usual I found this excellent Stackoverflow answer.
Source: http://www.tcpipguide.com/free/t_HTTPRequestMessageFormat.htm
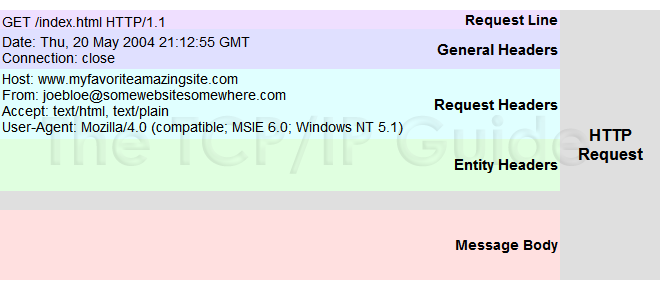
As we see in the picture, after the headers section, there is the body section, which is where the body string we generated will be put in. But how will the web-server know the format of the body section and where it actually ends? That is why we put in two 'headers' in the 'options' object.
Here we specify the type of the body and the actual length of it. Okay, now that we specified the type and the length, how are we going to send the string? We simply write it to the 'ClientRequest' object returned by the 'http.request', like this
]]>var http = require('http');
var options = {
host: 'localhost',
path: '/users/1',
port: 3000,
method: 'PUT'
};
var callback = function(response) {
var str = '';
//another chunk of data has been recieved, so append it to `str`
response.on('data', function(chunk) {
str += chunk;
});
//the whole response has been recieved, so we just print it out here
response.on('end', function() {
console.log(str);
});
};
http.request(options, callback).end();
This works well. It creates a HTTP PUT request, to the server hosted at localhost on port 3000 and in the path '/users/1'. Now the interesting part is, normally, when we send PUT/POST requests, we used to send parameters. These parameters will be represented normally as key-value pairs. It will be easy to represent them in JSON format. So, the above code just needs few more changes to send the request with a JSON body.var http = require('http');
var bodyString = JSON.stringify({
username: 'thefourtheye',
password: '********'
});
var headers = {
    'Content-Type': 'application/json',
    'Content-Length': bodyString.length
};
var options = {
host: 'localhost',
path: '/users/1',
port: 3000,
method: 'PUT',
headers: headers
};
// callback is same as in the above seen example.
...
...
http.request(options, callback).write(bodyString);
What we are actually doing here is, creating a JSON structure for the form body and then we are converting that to a valid JSON string. This is important, since we are sending the body as a JSON structure, it should conform to the JSON semantics. So, if you printed the bodyString, you would get something like this{"username":"thefourtheye","password":"********"}
Now, we constructed the body string. But, how will we let the server know that the request is not over immediately after the HTTP Request line and the headers in the HTTP Request.Source: http://www.tcpipguide.com/free/t_HTTPRequestMessageFormat.htm
As we see in the picture, after the headers section, there is the body section, which is where the body string we generated will be put in. But how will the web-server know the format of the body section and where it actually ends? That is why we put in two 'headers' in the 'options' object.
var headers = {
'Content-Type': 'application/json',
'Content-Length': bodyString.length
};
Here we specify the type of the body and the actual length of it. Okay, now that we specified the type and the length, how are we going to send the string? We simply write it to the 'ClientRequest' object returned by the 'http.request', like this
http.request(options, callback).write(bodyString);That is it :-)