thefourtheye's weblog

opinions are my own; try code/suggestions at your own risk

Sublime Text 3 Unhiding Menu in Ubuntu - Simpler Solution

| Comments

The method which I mentioned in this blog post of mine, solves the problem, but then you have to
  1. Close the Sublime Text
  2. Fire up a terminal
  3. Execute a command or two
  4. Open Sublime Text again
Quite a lot of steps to do. But then I found a simpler solution today and it works like a charm for me. The solution is to use "Keyboard Shortcuts" :-) Let me explain in detail.
  1. Click Preferences -> Key Bindings - User
  2. In the window that opens, you need to add a new keyboard shortcut for the command "toggle_menu". For example, this is how my shortcuts looks like
    [{"keys": ["ctrl+\\"], "command": "toggle_side_bar"},
    {"keys": ["ctrl+shift+m"], "command": "toggle_menu"}]
  3. Save the file and start doing your happy dance.
Now, you can simply press the keyboard shortcut whatever you choose to assign to toggle menu :-)

Python 3.5 and Django 1.7's HTMLParseError

| Comments

I just updated my Python installation to 3.5 Alpha 1 and started with Django today and I hit a road block already. It all went fine, when I created the virtual environment and installed Django 1.7.4 in it. And then when I did startproject, I got AttributeError: module 'html.parser' has no attribute 'HTMLParseError'.
(py3.5venv) ➜  myProject git:(master) ✗ django-admin.py startproject myProject
Traceback (most recent call last):
File "/py3.5venv/bin/django-admin.py", line 5, in
management.execute_from_command_line()
File "/py3.5venv/lib/python3.5/site-packages/django/core/management/__init__.py", line 385, in execute_from_command_line
utility.execute()
File "/py3.5venv/lib/python3.5/site-packages/django/core/management/__init__.py", line 354, in execute
django.setup()
File "/py3.5venv/lib/python3.5/site-packages/django/__init__.py", line 18, in setup
from django.utils.log import configure_logging
File "/py3.5venv/lib/python3.5/site-packages/django/utils/log.py", line 13, in
from django.views.debug import ExceptionReporter, get_exception_reporter_filter
File "/py3.5venv/lib/python3.5/site-packages/django/views/debug.py", line 10, in
from django.http import (HttpResponse, HttpResponseServerError,
File "/py3.5venv/lib/python3.5/site-packages/django/http/__init__.py", line 4, in
from django.http.response import (
File "/py3.5venv/lib/python3.5/site-packages/django/http/response.py", line 13, in
from django.core.serializers.json import DjangoJSONEncoder
File "/py3.5venv/lib/python3.5/site-packages/django/core/serializers/__init__.py", line 23, in
from django.core.serializers.base import SerializerDoesNotExist
File "/py3.5venv/lib/python3.5/site-packages/django/core/serializers/base.py", line 6, in
from django.db import models
File "/py3.5venv/lib/python3.5/site-packages/django/db/models/__init__.py", line 6, in
from django.db.models.query import Q, QuerySet, Prefetch # NOQA
File "/py3.5venv/lib/python3.5/site-packages/django/db/models/query.py", line 13, in
from django.db.models.fields import AutoField, Empty
File "/py3.5venv/lib/python3.5/site-packages/django/db/models/fields/__init__.py", line 18, in
from django import forms
File "/py3.5venv/lib/python3.5/site-packages/django/forms/__init__.py", line 6, in
from django.forms.fields import * # NOQA
File "/py3.5venv/lib/python3.5/site-packages/django/forms/fields.py", line 18, in
from django.forms.utils import from_current_timezone, to_current_timezone
File "/py3.5venv/lib/python3.5/site-packages/django/forms/utils.py", line 15, in
from django.utils.html import format_html, format_html_join, escape
File "/py3.5venv/lib/python3.5/site-packages/django/utils/html.py", line 16, in
from .html_parser import HTMLParser, HTMLParseError
File "/py3.5venv/lib/python3.5/site-packages/django/utils/html_parser.py", line 12, in
HTMLParseError = _html_parser.HTMLParseError
AttributeError: module 'html.parser' has no attribute 'HTMLParseError'
Then Antti Haapala (a friend from Stakoverflow's Python Chat room) found out that it is because HTMLParseError is deprecated from Python 3.3 onwards and removed in Python 3.5, as per the official documentation. He continued the investigation and found out that django guys are already aware of this, as they have a bug raised, and the fix has been already delivered to the code repository.
Now, all we can do is, wait for the version of django which officially supports Python 3.5 or manually patch html_parser.py file as per the above shown fix. Even if we patch it manually, there is no guarantee that everything else will work fine.

Ubuntu Overlapping Displays While Scaling Dual Monitor Setup

| Comments

Today, again I wanted to change my screen's display size, in my Ubuntu 14.04. This time I have a dual monitor setup and I tried all the commands I mentioned in my blog post Ubuntu scaling the display (Zooming).
➜  ~  xrandr
Screen 0: minimum 8 x 8, current 2560 x 1024, maximum 16384 x 16384
VGA-0 connected 1280x1024+1280+0 (normal left inverted right x axis y axis) 376mm x 301mm
1280x1024 60.0*+ 75.0
1152x864 75.0
1024x768 75.0 60.0
800x600 75.0 60.3
640x480 75.0 59.9
LVDS-0 connected (normal left inverted right x axis y axis)
1600x900 60.0 + 40.0
DP-0 connected primary 1280x1024+0+0 (normal left inverted right x axis y axis) 376mm x 301mm
1280x1024 60.0*+ 75.0
1152x864 75.0
1024x768 75.0 60.0
800x600 75.0 60.3
640x480 75.0 59.9
DP-1 disconnected (normal left inverted right x axis y axis)
HDMI-0 disconnected (normal left inverted right x axis y axis)
DP-2 disconnected (normal left inverted right x axis y axis)
DP-3 disconnected (normal left inverted right x axis y axis)
➜ ~ xrandr --output DP-0 --scale 1.25x1.25
➜ ~ xrandr --output VGA-0 --scale 1.25x1.25
➜ ~ xrandr
Screen 0: minimum 8 x 8, current 2880 x 1280, maximum 16384 x 16384
VGA-0 connected 1600x1280+1280+0 (normal left inverted right x axis y axis) 376mm x 301mm
1280x1024 60.0*+ 75.0
1152x864 75.0
1024x768 75.0 60.0
800x600 75.0 60.3
640x480 75.0 59.9
LVDS-0 connected (normal left inverted right x axis y axis)
1600x900 60.0 + 40.0
DP-0 connected primary 1600x1280+0+0 (normal left inverted right x axis y axis) 376mm x 301mm
1280x1024 60.0*+ 75.0
1152x864 75.0
1024x768 75.0 60.0
800x600 75.0 60.3
640x480 75.0 59.9
DP-1 disconnected (normal left inverted right x axis y axis)
HDMI-0 disconnected (normal left inverted right x axis y axis)
DP-2 disconnected (normal left inverted right x axis y axis)
DP-3 disconnected (normal left inverted right x axis y axis)
Though it changes the display size, both the screens had overlapping images. After so much analysis, I found one inconsistency in the output of xrandr, before and after scaling. Note the first two lines.
Screen 0: minimum 8 x 8, current 2560 x 1024, maximum 16384 x 16384
VGA-0 connected 1280x1024+1280+0 (normal left inverted right x axis y axis) 376mm x 301mm
...
Screen 0: minimum 8 x 8, current 2880 x 1280, maximum 16384 x 16384
VGA-0 connected 1600x1280+1280+0 (normal left inverted right x axis y axis) 376mm x 301mm
Individual screen's resolution has scaled to 1600x1280 from 1280x1024, but the total screen size is 2880 x 1280, also the screen's position is 1280x0 instead of 1600x0. So, to get over the overlapping problem, I used the following command, after reboot, and it worked
➜  ~  xrandr --output DP-0 --scale 1.25x1.25 --pos 0x0 --output VGA-0 --scale 1.25x1.25 --pos 1600x0
➜ ~ xrandr
Screen 0: minimum 8 x 8, current 3200 x 1280, maximum 16384 x 16384
VGA-0 connected 1600x1280+1600+0 (normal left inverted right x axis y axis) 376mm x 301mm
1280x1024 60.0*+ 75.0
1152x864 75.0
1024x768 75.0 60.0
800x600 75.0 60.3
640x480 75.0 59.9
LVDS-0 connected (normal left inverted right x axis y axis)
1600x900 60.0 + 40.0
DP-0 connected primary 1600x1280+0+0 (normal left inverted right x axis y axis) 376mm x 301mm
1280x1024 60.0*+ 75.0
1152x864 75.0
1024x768 75.0 60.0
800x600 75.0 60.3
640x480 75.0 59.9
DP-1 disconnected (normal left inverted right x axis y axis)
HDMI-0 disconnected (normal left inverted right x axis y axis)
DP-2 disconnected (normal left inverted right x axis y axis)
DP-3 disconnected (normal left inverted right x axis y axis)
Now, you see that both the actual size of the screen and the starting position of the second screen is set properly.
Screen 0: minimum 8 x 8, current 3200 x 1280, maximum 16384 x 16384
VGA-0 connected 1600x1280+1600+0 (normal left inverted right x axis y axis) 376mm x 301mm
...

Python's Venv Problem With Ensurepip in Ubuntu

| Comments

Ubuntu 14.04's Python 3.4 installation has a problem with ensurepip module, as described in this bug. So if you follow the steps mentioned in the official documentation, you would see an error message like this
➜  Python  python3 -m venv py3.4venv
Error: Command '['/home/thefourtheye//py34venv/bin/python3', '-Im', 'ensurepip', '--upgrade', '--default-pip']' returned non-zero exit status 1
To resolve this problem, first install the venv, without pip, like this
python3 -m venv py3.4venv --without-pip
And then if you install pip, like this, it will still fail
(py3.4venv) ➜  py3.4venv  python -m ensurepip --upgrade
/home/thefourtheye/Python/py3.4venv/bin/python: No module named ensurepip
(py3.4venv) ➜ py3.4venv python
Python 3.4.0 (default, Apr 11 2014, 13:05:11)
[GCC 4.8.2] on linux
Type "help", "copyright", "credits" or "license" for more information.
...
So, you need to install, pip separately, like mentioned in the pip's official documentation. So, the actual list of steps go like this
➜  Python  python3 -m venv py3.4venv --without-pip 
➜ Python cd py3.4venv
➜ py3.4venv source bin/activate
(py3.4venv) ➜ py3.4venv wget https://bootstrap.pypa.io/get-pip.py
--2014-12-30 14:35:34-- https://bootstrap.pypa.io/get-pip.py
Resolving bootstrap.pypa.io (bootstrap.pypa.io)... 103.245.222.175
Connecting to bootstrap.pypa.io (bootstrap.pypa.io)|103.245.222.175|:443... connected.
HTTP request sent, awaiting response... 200 OK
Length: 1581355 (1.5M) [text/x-python]
Saving to: ‘get-pip.py’

100%[=====================================================================================================================>] 15,81,355 129KB/s in 8.9s

2014-12-30 14:35:43 (173 KB/s) - ‘get-pip.py’ saved [1581355/1581355]

(py3.4venv) ➜ py3.4venv python get-pip.py
Collecting pip
Downloading pip-6.0.3-py2.py3-none-any.whl (1.3MB)
100% |################################| 1.3MB 139kB/s
Collecting setuptools
Downloading setuptools-9.1-py2.py3-none-any.whl (552kB)
100% |################################| 552kB 180kB/s
Installing collected packages: setuptools, pip


Successfully installed pip-6.0.3 setuptools-9.1
(py3.4venv) ➜ py3.4venv deactivate
➜ py3.4venv source bin/activate
(py3.4venv) ➜ py3.4venv pip install django
Collecting django
Using cached Django-1.7.1-py2.py3-none-any.whl
Installing collected packages: django

Successfully installed django-1.7.1
(py3.4venv) ➜ py3.4venv which pip
/home/thefourtheye/Python/py3.4venv/bin/pip
(py3.4venv) ➜ py3.4venv

Sending POST/PUT Requests, With JSON Form Body, in Node.js

| Comments

Today one of my friends asked me to help him with sending a PUT request to a remote server, in Node.js. I started Googling and as usual I found this excellent Stackoverflow answer.
var http = require('http');

var options = {
host: 'localhost',
path: '/users/1',
port: 3000,
method: 'PUT'
};

var callback = function(response) {
var str = '';

//another chunk of data has been recieved, so append it to `str`
response.on('data', function(chunk) {
str += chunk;
});

//the whole response has been recieved, so we just print it out here
response.on('end', function() {
console.log(str);
});
};

http.request(options, callback).end();
This works well. It creates a HTTP PUT request, to the server hosted at localhost on port 3000 and in the path '/users/1'. Now the interesting part is, normally, when we send PUT/POST requests, we used to send parameters. These parameters will be represented normally as key-value pairs. It will be easy to represent them in JSON format. So, the above code just needs few more changes to send the request with a JSON body.
var http = require('http');

var bodyString = JSON.stringify({
username: 'thefourtheye',
password: '********'
});

var headers = {
'Content-Type': 'application/json',
'Content-Length': bodyString.length
};

var options = {
host: 'localhost',
path: '/users/1',
port: 3000,
method: 'PUT',
headers: headers
};

// callback is same as in the above seen example.
...
...

http.request(options, callback).write(bodyString);
What we are actually doing here is, creating a JSON structure for the form body and then we are converting that to a valid JSON string. This is important, since we are sending the body as a JSON structure, it should conform to the JSON semantics. So, if you printed the bodyString, you would get something like this
{"username":"thefourtheye","password":"********"}
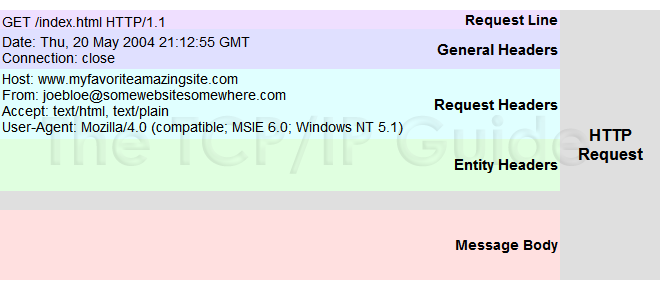
Now, we constructed the body string. But, how will we let the server know that the request is not over immediately after the HTTP Request line and the headers in the HTTP Request.

Source: http://www.tcpipguide.com/free/t_HTTPRequestMessageFormat.htm


As we see in the picture, after the headers section, there is the body section, which is where the body string we generated will be put in. But how will the web-server know the format of the body section and where it actually ends? That is why we put in two 'headers' in the 'options' object.
var headers = {
'Content-Type': 'application/json',
'Content-Length': bodyString.length
};

Here we specify the type of the body and the actual length of it. Okay, now that we specified the type and the length, how are we going to send the string? We simply write it to the 'ClientRequest' object returned by the 'http.request', like this
http.request(options, callback).write(bodyString);
That is it :-)